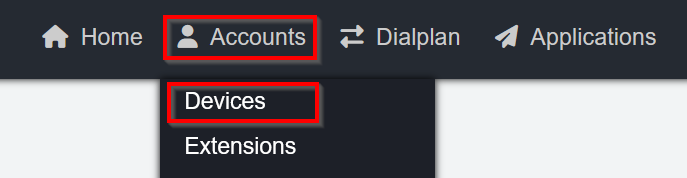
¶ Devices
Devices, such as physical desk phones, conference phones, paging gateways, etc. are all managed through the Devices menu option.
NOTE: This is an advanced topic and is typically not necessary for most clients. If unsure about accessing and modifying devices, please reach out to the System Installer.
Setting up a new desk phone is a multi-step process. First, a Device is programmed into the system, then an Extension (with or without voicemail) is programmed and finally, the Extension is linked to the Device.
To Add a new Device
- When logged in to the HUCS Web Management, Navigate to Accounts - Devices.
- Click the +ADD button in the top right corner of the page.
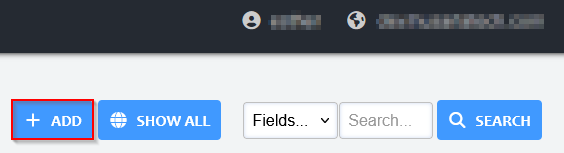
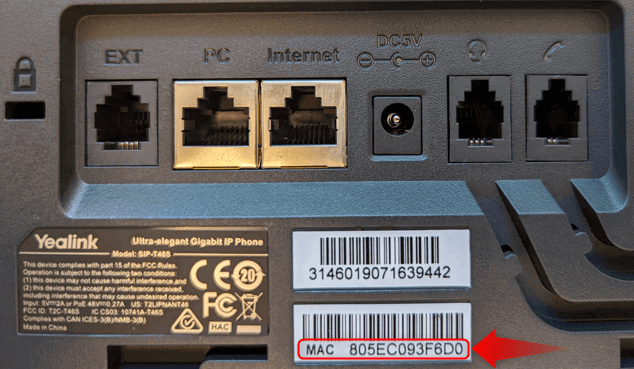
- Enter the device's MAC address. This will be a unique identifier for every device being added into the system.
- MAC addresses are typically found on the back of devices:
-
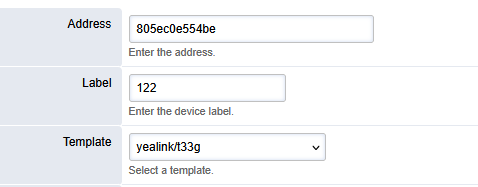
Provide a label / common name for the device. This will usually be the extension number being assigned to this device.
-
Select the template of your phone model. This will ensure the proper pre-configured buttons and other feature options are loaded on the device.
- Note the lower case letters with no dashes or spaces used in the Address sample below.
If a template does not exist for the device, please contact your System Installer.
-
If the extension is already made, and you are just adding this new device to replace a previous / failed device, it is possible to attach the device to the extension on the "Lines" option. However, it is usually easier to attach a device to an extension on the Extensions page via the Device Provisioning section (see below), as all fields will auto-populate (Server Address, Authentication ID, password, etc).
-
On the Keys option, you can manually configure the keys (buttons) on your device to override the template. As each device is unique in the options supported here, please contact your System Installer for further details.
Typically, a new device is enrolled with a MAC address and template, leaving the rest of options blank. They will get auto-populated in other areas of the system during enrollment procedure.
- When done, click SAVE in top right corner.
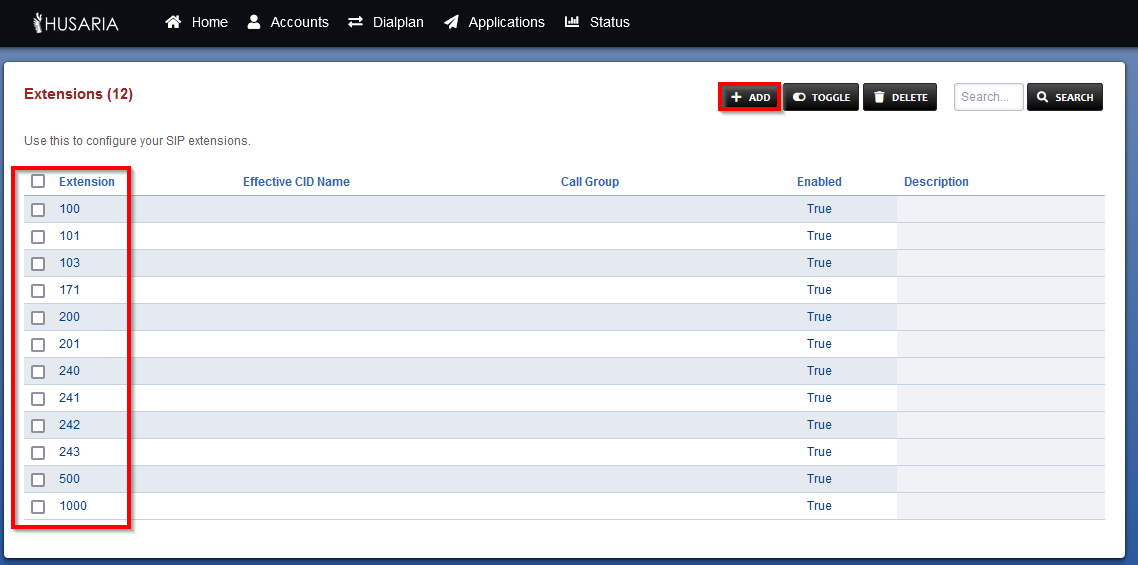
¶ Extensions
¶ Extensions Standards
An extension is a unique short number within a phone system that directs calls to a specific destination, such as a user, device, system feature etc. To keep the system organized and make administration easier, certain ranges of numbers are reserved for specific functions.
Below are the standard extension ranges.
| Extension Block | Description |
|---|---|
| 100 to 599 or 1000+ | Regular deskphone / wireless |
| 60x -> 61x | Ring Groups |
| 65x -> 66x | Queues |
| 671 -> 679 | Call Flows (Manually triggered Button) |
| 70x | Conferences |
| 73x | Recordings/Phrases |
| 77x | Paging |
| 80x -> 81x | IVRs |
| 85x -> 86x | Time Conditions |
Most systems follow these guidelines, but some sites may use different programming to meet unique requirements. If you have questions about your extensions, please contact your Service Provider.
¶ Create a new extensions
- Access the Extensions page in Accounts tab
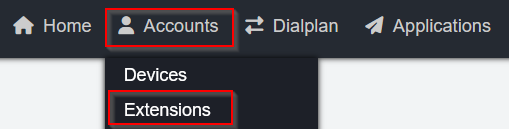
- Click +ADD in the top right to add a new extension
¶ Extension Fields
Fill in the extension feids
The following is a generic overview of each configurable field for each extension. Some fields are listed under different headings to group their specific purposes:
- Extension: field allows you to configure/change/modify the actual extension number.
- Password: (recommend leaving blank, System will auto create a secure password) The SIP password for the extension; this password is important for the registration of the device.
- Users: (recommend leaving blank) allows you to link users who can log into the system to manage this particular extension.
- Voicemail Password: Enter, update, change the numeric voicemail password here.
- Account Code: Enter the account code here. It is the HUCS domain for your site. ex. "abcd".hucs.husariatech.com, where as the "abcd" represents your site.
- Device Provisioning: This shows any current piece of hardware currently provisioned and linked to this extension (Should only have one device listed).
- Effective Caller ID Name: Internal caller ID, set / modify the internal caller ID name of the extension.
- Effective Caller ID Number: Internal caller Number, set / modify the internal caller ID number of the extension.
- Outbound Caller ID Name: Outbound caller ID, set / modify the external caller ID name of the extension.
- Effective Caller ID Number: Outbound caller Number, set / modify the external caller ID number of the extension.
- Emergency Caller ID Name: Emergency caller ID, set / modify the Emergency caller ID name of the extension.
- Emergency Caller ID Number: Emergency caller Number, set / modify the Emergency caller ID number of the extension.
- Directory Full Name: you can enter the extensions' users' full name here if you are using the dial-by-name Directory IVR function.
- Directory Visible: if you are using the dial-by-name Directory IVR function, you can choose to show/hide this extension in that directory.
- Voicemail Enabled: Enable / disable voicemail for this extension
- Voicemail Mail To: Enter the email address to send the voicemail to (optional).
- Transcription Enabled: Set true or False
- Voicemail File: Recommended "Audio File Attachment", Select how audio file is included in the email notification.
- Voicemail Keep Local: Recommended "False", Choose whether to keep the voicemail in the system after sending the email notification.
- Call Timeout: Set number of seconds before the call is sent to voicemail, keep in mind if the extension is in a ring group the timeout should be the same or higher than the time of the ringgroup's duration
¶ Device Provisioning
Under the Device Provisioning option on the Extension page, you can see any existing devices (hardware such as physical desk phone) attached to this extension.

-
If you need to change the device due to wear/tear/damage/theft etc., click the minus sign
 to delete the existing device.
 -
Next, from the drop menus, choose a Line option (typically Line '1'), choose the MAC address from the pre-loaded devices (see Devices section above to add a new device) and choose the appropriate device template. Click +ADD when done adding the device details to the Device Provisioning section.
¶ Configuring Voicemail
Each extension comes with voicemail included and enabled by default. A maximum of 100 messages can be stored in the voicemail inbox.
- Voicemail Password: change/add the voicemail password.

- Voicemail Enabled: set to True if you would like this extension to have voicemail, to false if voicemail is not required.

- Voicemail Mail to: enter a valid email address to send the voicemail recording to. Note that only one email address can be added. If you would like to send the voicemail to multiple email addresses, contact your IT administrator for them to create an email distribution list which you can then enter here.

- Voicemail File: we recommend selecting Audio File Attachment. This will email a .WAV file in the email that can be played on any device.

¶ Call Restrictions / Allowances
If your system is set up to allow different call allowance permissions, then by default no external calls are allowed. Each external call type will need to be explicitly listed on a per-extension basis. You can use one of the following entries to permit/allow the related call type. Separate each permission label with a comma.
These labels are entered into the Toll Allow field in the extension (case-sensitive):
- emergency: Allows '911' calls
- canadausa: Allows calls to any 10-digit (11-digit if you put 1 in front) number in Canada and USA
- international: Allows calls to any phone number anywhere in the world.
- Other options may be provided by your System Installer

Note: With Husaria Hosted Voice services, all 10-digit calls in Canada and USA are treated equally; there is no difference in billing for a USA call vs a Canada call.
¶ Call Forward
On the Call Forward page, you can manage alternate destinations for calls depending on the condition. Note that unless a Call Forward field is enabled, the default destination is to the extension voicemail.
- Press the Call Forward button in the top right of the Extensions page to manage the extensions' call forward settings.

- Next to the entry on the Call Forward page, enter in a local/internal extension or an external 10-digit number (i.e. cellular phone number) to where you want the call forwarded to.

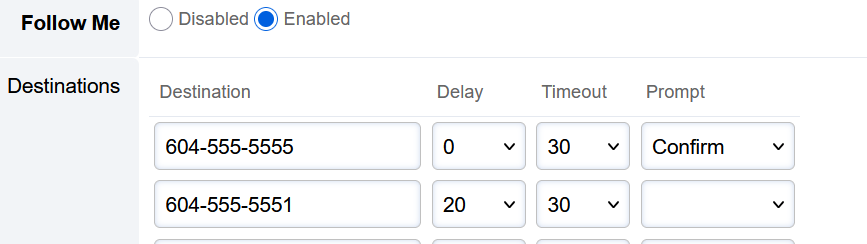
¶ Follow Me
On the Call Forward page, Follow Me is an advanced Call Forward option that forwards calls to alternate destinations either concurrently or in succession. You can set multiple destinations, set a delay between destinations, and also control how long the call should be active prior to hitting a timeout and returning to the default extension destination (typically, voicemail).
The Prompt column with the dropdown option Confirm forces the recipient to press 1 to confirm that they are a real person answering the forwarded call. This is to prevent cellular phone voicemail from answering the call, in the case where the user wants all calls to timeout back to their extension voicemail.
¶ Advanced Voicemail Control
-
To manage advanced functions of a user's voicemail box, click Voicemail under the Applications dropdown menu.
-
Select the extension's voicemail box you would like to manage.
-
You can modify many options, including:
- Reset/change voicemail password
- Change the greeting to be played (any of the 9 voicemail greeting slots can be chosen here)
- Choose whether to provide instructions/options to the caller when they reach the user's voicemail box
- Create an option / menu at the user's voicemail box to be redirected to other system or external locations
- Add/modify the email address destination for voicemail-to-email
- Choose whether to keep the voicemail on the system if voicemail-to-email is enabled
- Add/modify voicemail forward destinations
Voicemail forward destinations are handy when someone else is managing this extension's voicemail. Set the forwarded destination and also change the "Keep Local" option to false. This will make all voicemails forward to the alternate destination and nothing will be kept on this local extension's voicemail.