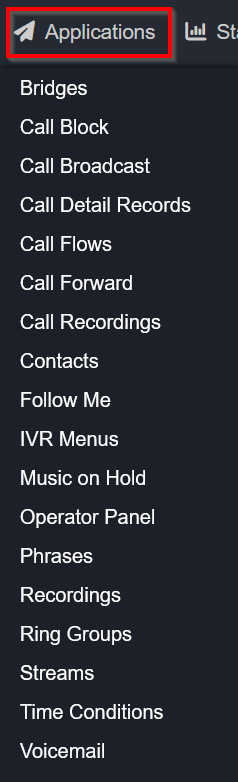
¶ APPLICATIONS
Access to features is through the Applications drop down menu. Below are details on the commonly used Applications.
¶ Call Block
Call block is a feature designed to prevent unwanted calls, such as those from telemarketers or known spam numbers. When a blocked number attempts to call, the caller hears a series of tones followed by a message indicating the number is no longer in service. This helps to discourage future calls by prompting the caller to remove the number from their contact lists.
- On the Call Block Dashboard screen, there is a list of all numbers that have been blocked as well as an +ADD button

-
To add a number to the call block list, click the +ADD button in the top right corner of the Call Block page.
-
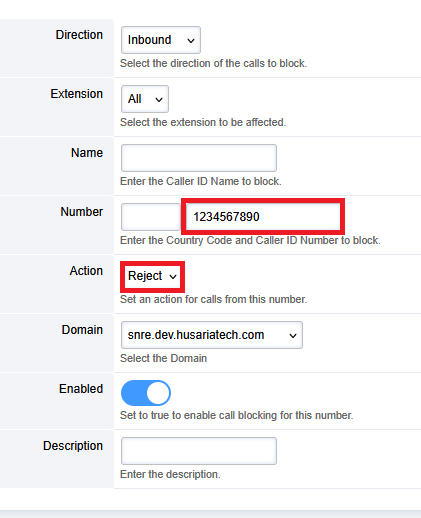
On the +ADD window, there are two ways to block a call.
- Option 1 - You can enter a phone number manually into the Number field of the Call Block section, and ensure the Action is set to Reject.
- Option 2 - If the call is recent, it will be in the Recent Calls section at the bottom of the screen. Click the checkbox next to the number you would like to block and then click BLOCK on the right side of the screen.

- The number is now blocked.
¶ Call Detail Records
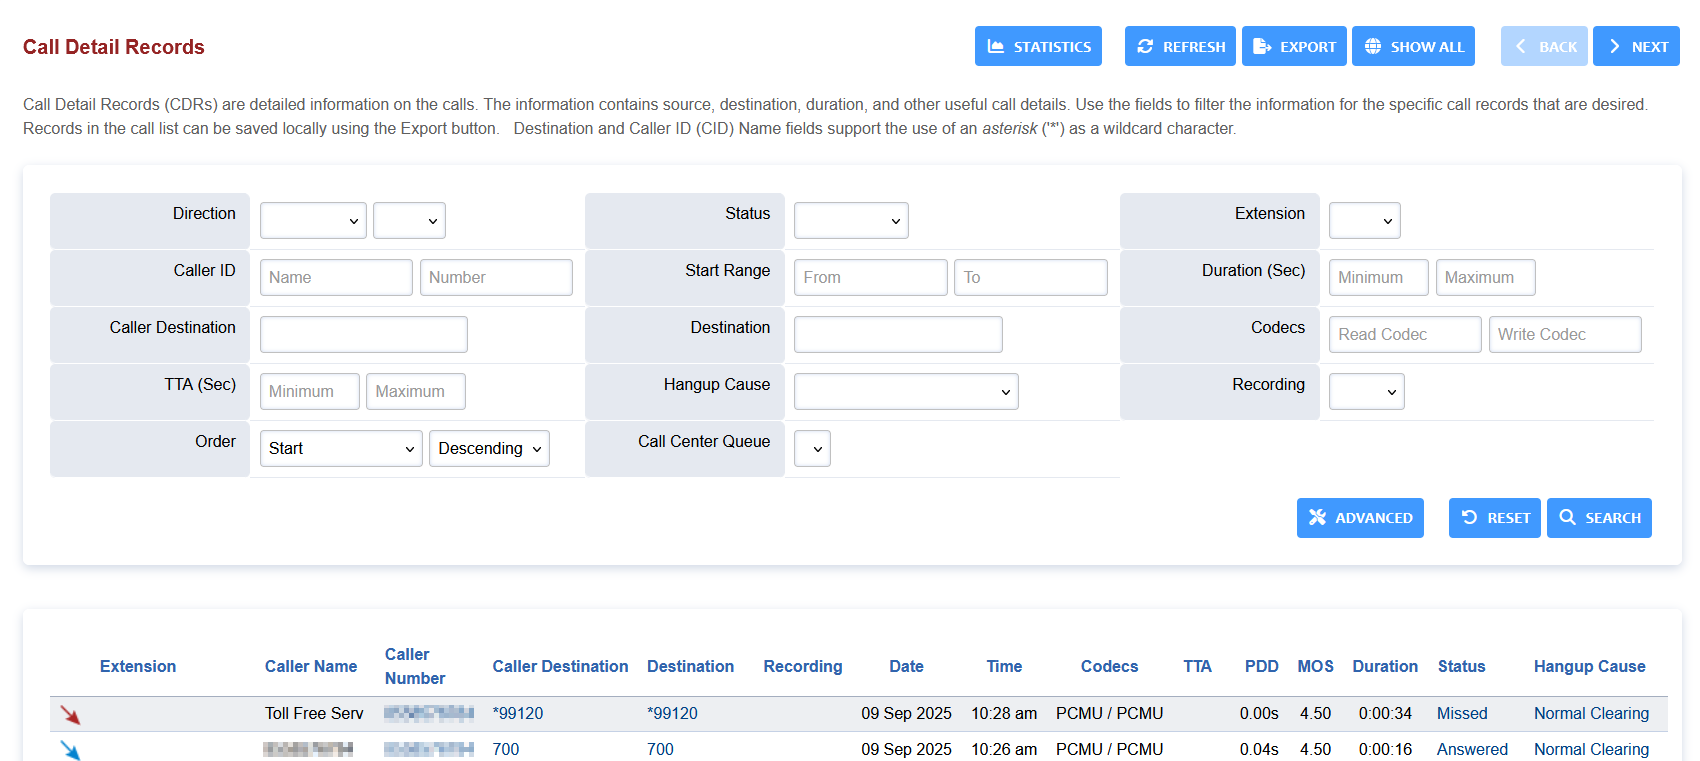
Details about each and every call within your PBX instance on HUCS is accessible on the Call Detail Records page.
At the top of the page you can set search parameters/filters to find details on a particular call record.
At the bottom half of the page are the records of every call with a date/time stamp.
¶ Call Flow
NOTE: This is an advanced topic. Please reach out to your System Installer for assistance.
Call Flow allows administrators to create new Feature Codes to allow their users to manually switch between options/destinations. This is useful for creating away modes to give users manual control of call flows. Examle. to send all incoming calls to a pre-determined IVR or away message while the receptionist is away from thier desk/phone. When they return, they would be able to reverse the manual control.
¶ Contacts
Contacts is a list of individuals and organizations.
- Click ADD to create a new contact
- Click EDIT to edit an existing contact
- Fill out the fields with pertinent information and click save.
- Users- Select the users that are allowed to view the contact
- Groups- Select the group that are allowed access to the contact.
¶ IVR Menus
IVRs (Interactive Voice Response) are the basis of menus within a PBX / phone system. IVRs are used to help direct callers to a particular destination.
Access IVRs via Applications -> IVR Menus
-
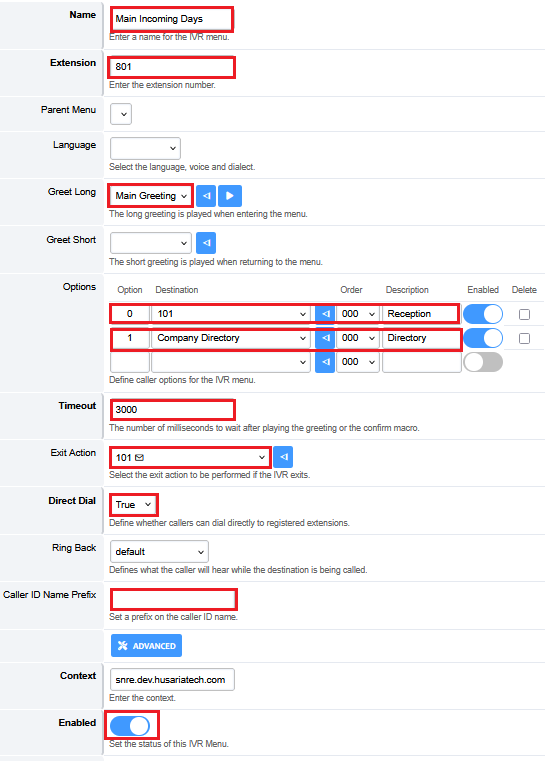
Provide a unique name for the IVR
-
Enter a unique extension number for the IVR. Typically IVRs use 800 extensions.
-
Use the drop down menu to select the recording / music file played when a caller enters the IVR. (See Recordings below)
-
Options:
- Option: Enter the dialcode / number (0 - 9 or special character) to be pressed by the caller for the particular destination
- Destination: Select from the drop down menu where to send the caller to when the option number is pressed.
- Order: The order list of the menu options. Usually left at 000.
- Description: A human-readable text field to describe the purpose of the Option / Destination
-
Timeout: The number of seconds (in milliseconds - 3000 milliseconds is default) to wait for caller input after the Greet Long is finished playing before sending the caller to the Exit Action.
-
Exit Action: The destination to send the caller to if no option selected or if an invalid option is pressed
-
Direct Dial: This setting will allow/deny the ability to directly enter an extension number if the caller knows it. If set to Deny, the caller will be forced to enter one of the Options created above.
-
Caller ID Name Prefix: (Optional) Add a (short) prefix to the caller ID, so the destinations will know that the caller came from this particular IVR.
¶ Recordings
Recordings section is used to create your own custom recordings, such as a greeting for an IVR. Once completed, the recording can be used in any of the other system Applications, such as IVRs, Ring Groups, Time Conditions, etc.
To create a new Recording:
- Dial
*732 - Enter the unique PIN number. Typically, your System Installer will set the PIN to your main building address. Check the top of the Recordings window or your System Installer handover documents to confirm your PIN.
- Enter a recording slot number. There are up to 9 slots available to make multiple recordings in succession.
- Start recording at the beep.
- When done recording, press # to finish and listen to the recording.
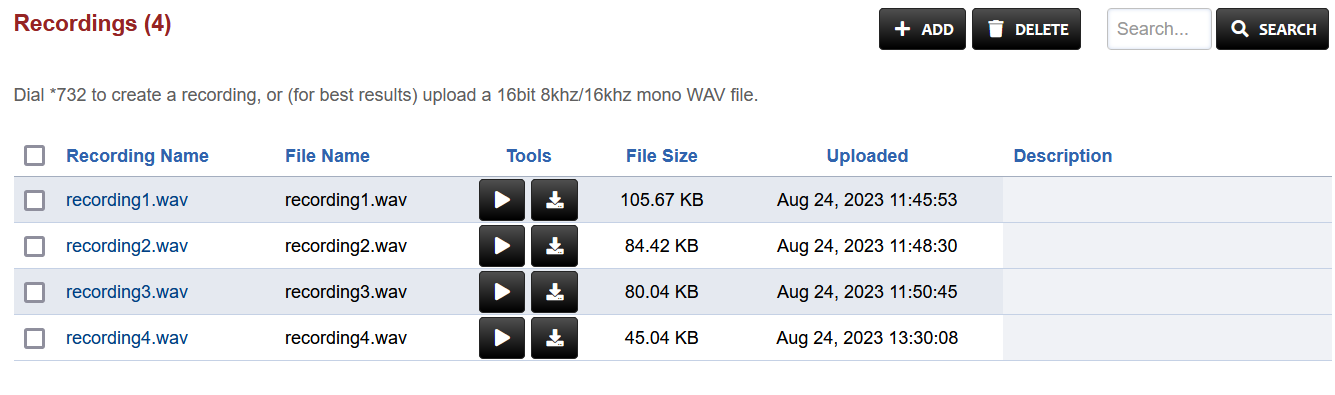
Once a recording is completed, it is strongly recommended that the Recording Name and File Name be changed so the recording is not overwritten in the future.
Each recording default name is “recording” + slot number chosen. In the above example, recording1.wav is the recording saved in slot 1.
To rename:
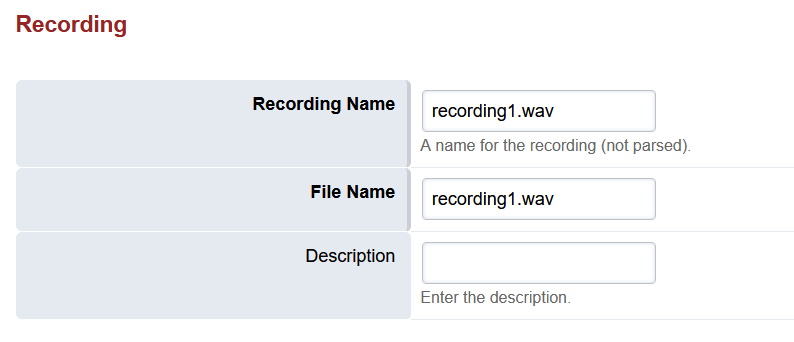
- Click on the recording1.wav to access the recording properties
-
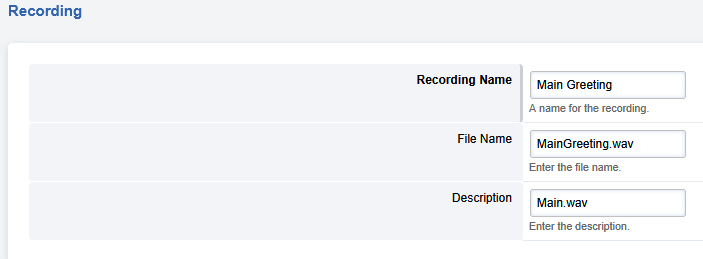
Change the Recording Name to something descriptive of the recording. Spaces are allowed for punctuation.
-
Change the File Name to an abbreviated version of the Recording Name. No spaces or special characters allowed.
-
Click Save in the top right corner to save/apply these name changes.
- Use the Tools next to each recording to play live through your browser or download as a .WAV file to your computer.

¶ Ring Groups
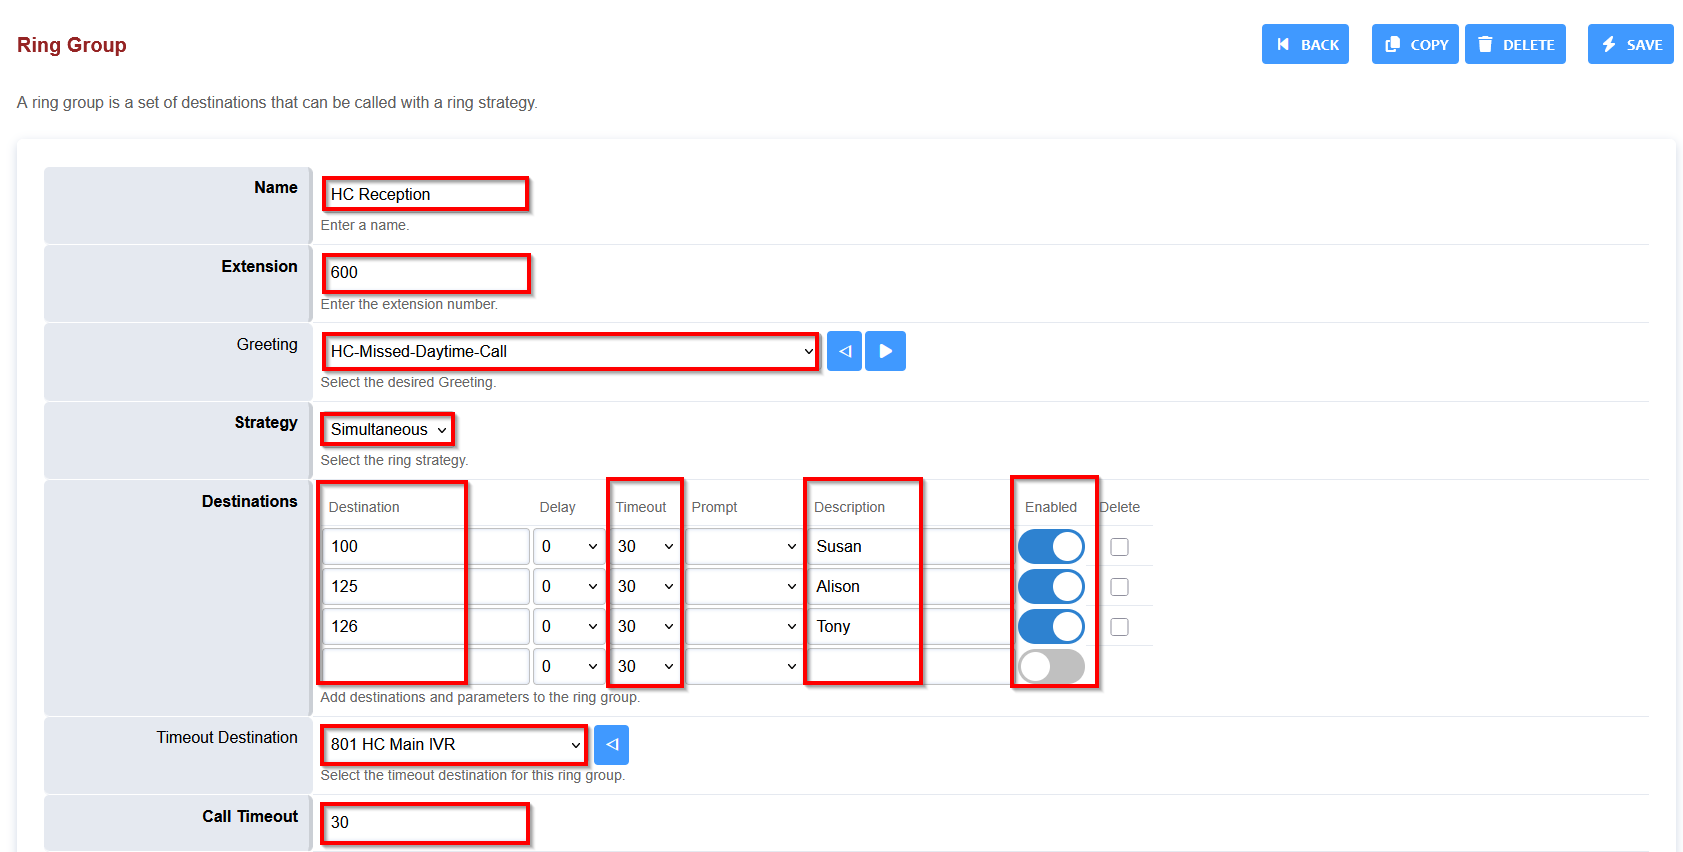
Ring Groups are used to ring/call multiple extensions concurrently. For example, a Ring Group could be created for a "Reception" group of extensions, allowing all phones in the group to ring on incoming calls.
To edit a Ring Group, click on the Ring Group extension number. To create a new Ring Group, press the +Add button.
-
Name: Enter a descriptive name for the Ring Group. e.g. Reception
-
Extension: Enter a unique extension number of the Ring Group. Must be unique within the system. To avoid complications, Ring Groups are usually in the 60x - 61x range.
-
Greeting: (Optional) Select from the dropdown menu a Recorded greeting to play to the caller prior to ringing out to the destinations below. (see Recordings)
-
Strategy: How the Destinations (extensions) in the Ring Group should ring. Select from the following:
- Enterprise - All Destinations in the Group ring at the same time. Each Destination has their own path/thread.
- Sequence - Destinations are called one at a time based on the Order assigned in Destinations.
- Simultaneous - All Destinations in the Ring Group ring at the same time. All Destinations share the same path/thread.
- Random - A random Destination in the Ring Group will ring.
- Roll over - Destinations are called in sequence based on Order, skipping over any busy Destinations.
-
Destinations: Enter extensions or external 10-digit numbers as destinations (where the call will ring). You can configure individual timeouts for each entry as well as checking whether the system should Prompt to confirm calls (i.e. to prevent cellular phone voicemail from receiving the call).
-
Timeout Destination: Select from the dropdown menu where the caller should be directed to if no one in the Ring Group answers the call.
-
Call Timeout: Enter the timeout (in seconds) prior to sending the caller to the Timeout Destination. Note, for calls that ring Destinations at the same time, this should be the time the phones ring. For calls that ring in sequence, this should be a total of all the timeouts for each Destination.
-
Distinctive Ring: (Optional) Set
1-10, for a unique/distinctive ringtone for Ring Group Calls. This is phone-type dependent, so test though the options for your best preference.
- Yealink Phones: recommended
2 - Grandstream Phones: recommended
2
Other options may be available depending on the SIP phone connected. Contact your System Installer to confirm programming options available for your phone.
¶ Time Conditions
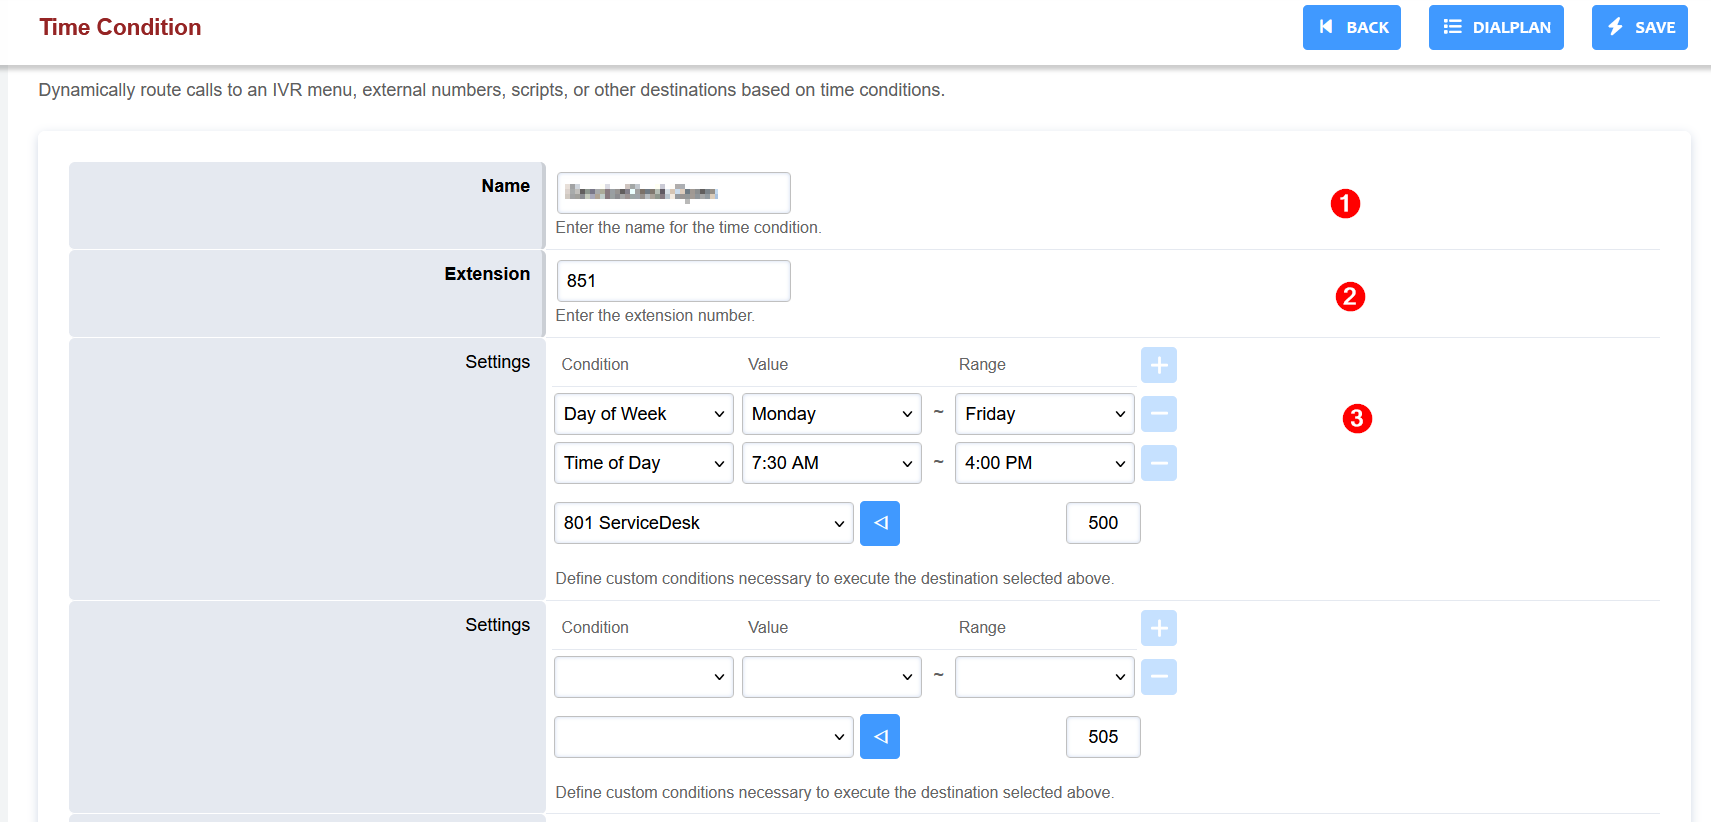
Time Conditions are used to set automations within the system to happen at certain hours of the day, days of the week, weeks of a month or any other unique timeframe throughout the year.
Access Time Conditions via Applications -> Time Conditions
-
Name: Enter a unique name for the Time Condition
-
Extension: Provide a unique extension within the system. To avoid extension conflicts, the range 85x to 86x is usually reserved for Time Conditions.
-
Settings: Enter the following
- Condition: Choose the type of time condition you would like to use, such as Day of Week and Time of Day
- Value: Select the start day/date/time of the Condition chosen
- Range: Select the end day/date/time of the Condition chosen
- Dropdown menu: Choose the destination to send the call if the above Condition/Value/Range are met
- Alternate Destination: Choose the destination to send the call If the Condition/Value/Range are not met
Multiple Settings/Criteria for a Time Condition can be used! Click the + Sign to the right of the first Setting to add another Setting option.
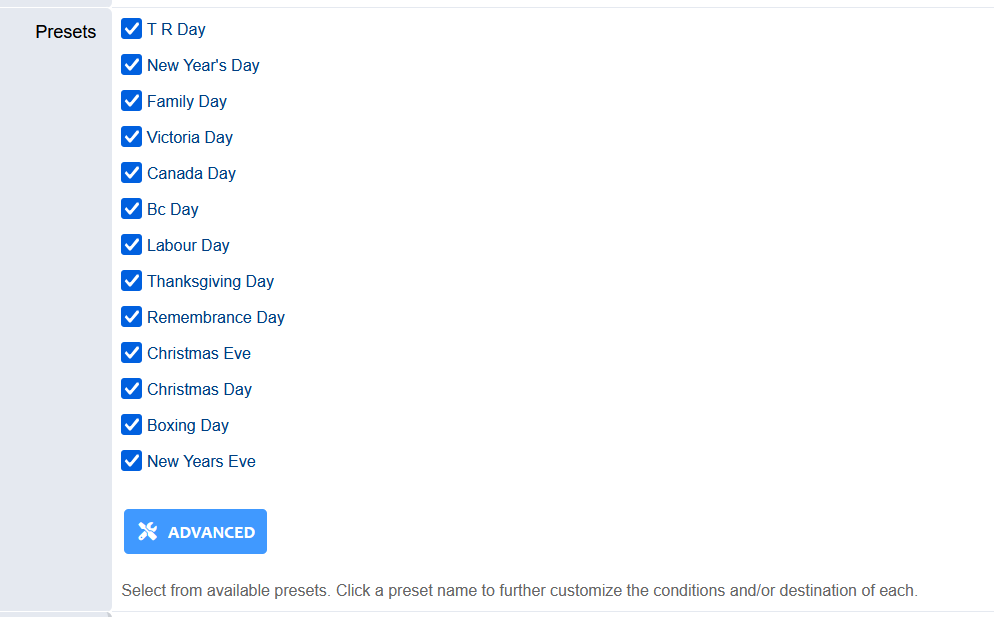
- Presets: Canadian (BC) holidays are listed as presets. Check each date that you want to exclude from the Settings above.
¶ Voicemail
On the Applications > Voicemail page, you can globally manage any extensions' voicemail settings without having to go into each individual extension's settings.
- On the main Voicemail page you can directly configure an extensions settings by clicking on the voicemail ID (Usually the same as the extension number).
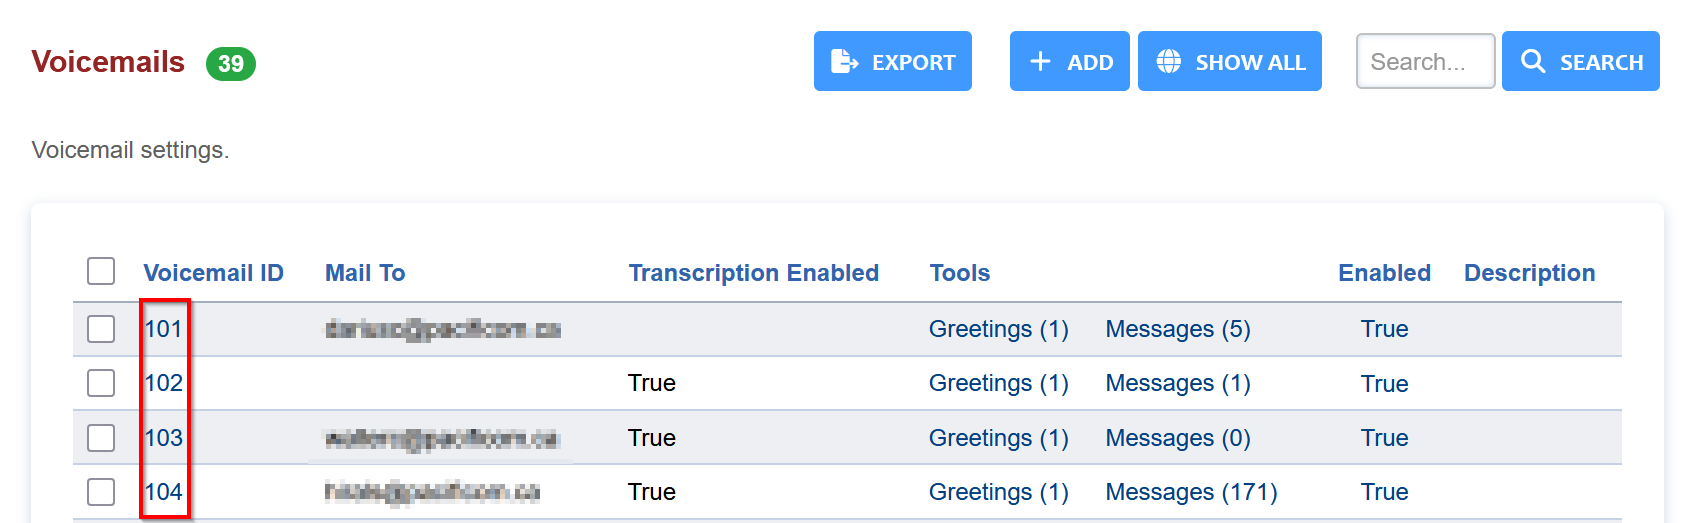
- Alternately, you can directly manage the extensions' voicemails by clicking on the Messages (x) link.
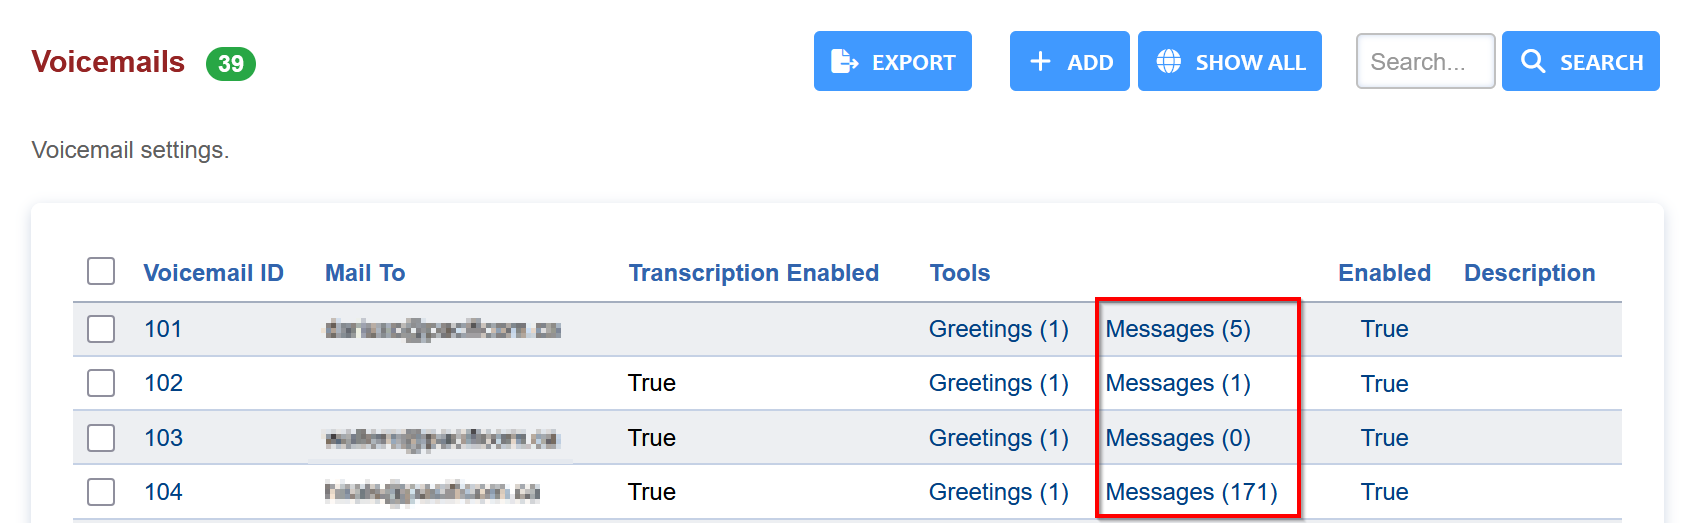
- Lastly, you can control the extension's greetings (recordings) by clicking on the Greetings link.

Example:
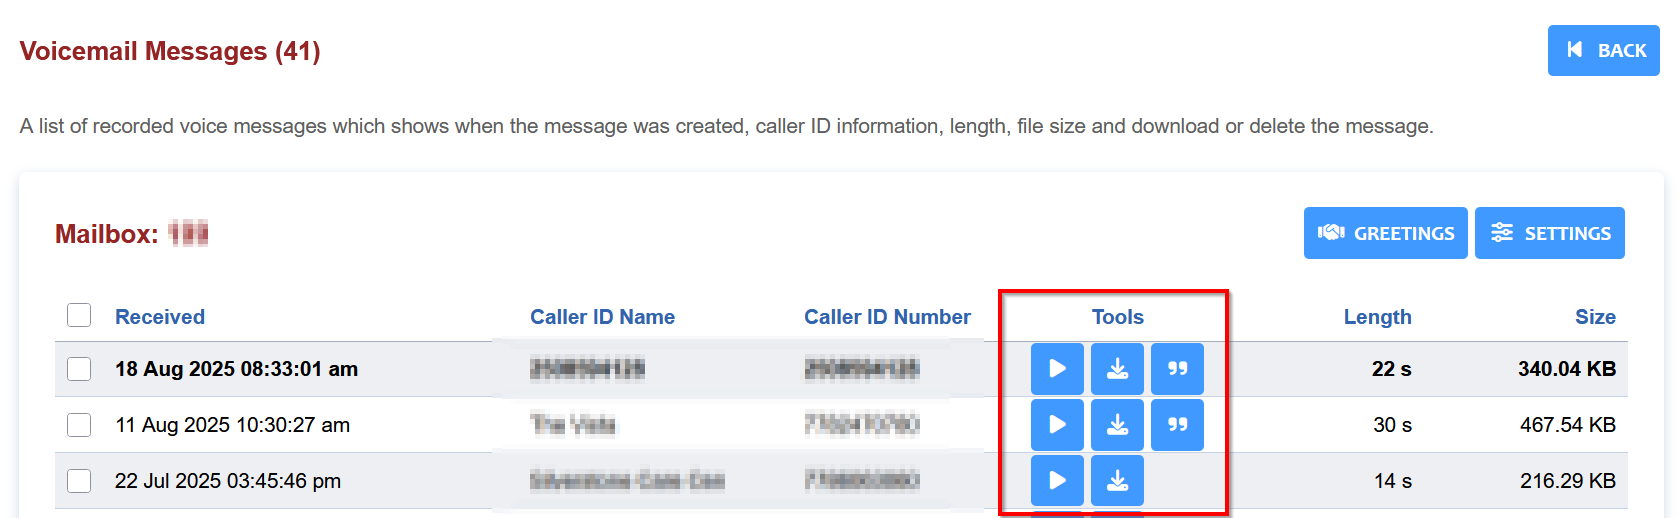
- If an extension has too many messages stored and you need to manually delete, you can click on the extension's Messages (x) link and be presented with a list of all their voicemails:

- Select the checkbox on the left next of one (or more) voicemail message(s) and then click DELETE in the top right corner to permanently remove the voicemail message(s).
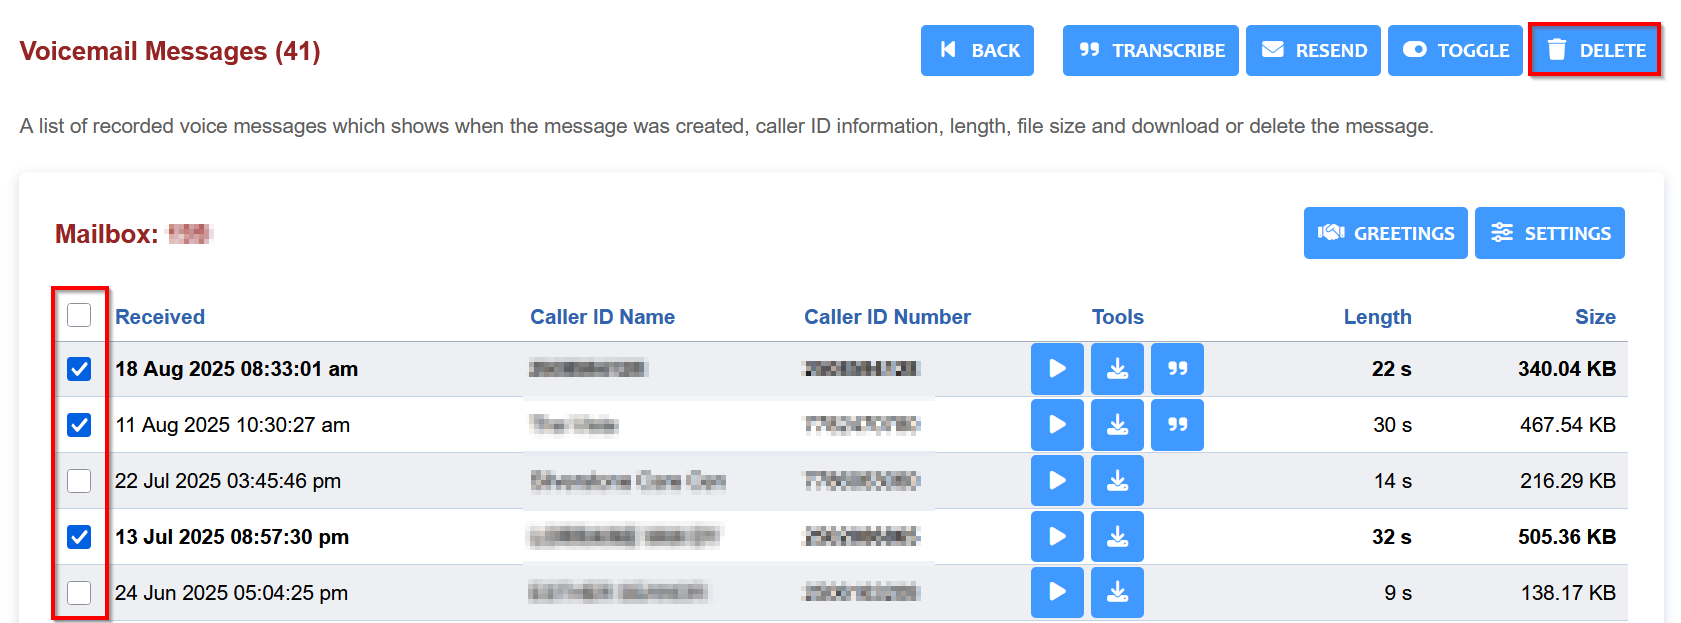
- In the Tools column, there is the option to play the voicemail as well as download it as a WAV file.